
As work gets executed and completed across areas, systems, and functions within a project, work will become released or ready for execution. SPS|PM enables teams to prepare for the execution of released work through the collaborative creation of the Next Production Plan, involving four key steps as shown in the image below.
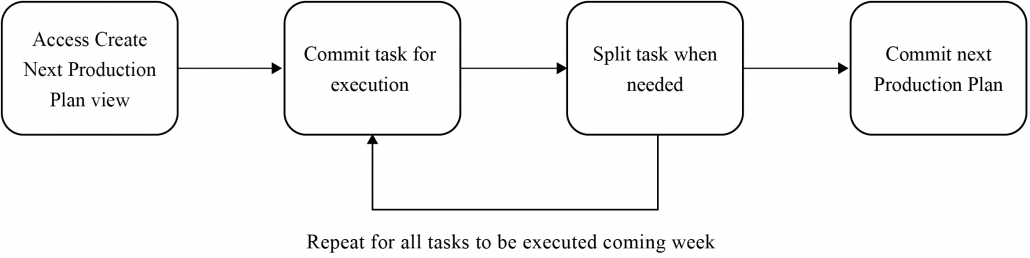
To create the Next Production Plan, you must first select (load) tasks to the Plan. Based on priorities, teams select tasks that are intended to be completed during the next Planning Horizon. To ensure capacity is only allocated to work that should and can be completed, and not to work that is out of sequence, the Next Production Plan view only shows tasks that have been released, meaning prerequisite work is already complete (or will be complete if committed) and work that is available to commit to a Plan.
It is important to understand that tasks are being committed for completion (versus just progress) and that their completion will be measured against this commitment as part of the next Production Planning cycle. Tasks viewable in the Next Production Plan can originate through different methods: as one-off tasks, from detailed standard processes, or they may have been uploaded from a legacy scheduling process / system or list of tasks.
When creating a Production Plan, a team member with Write Access can only load his / her tasks on a Production Plan. A member with Team-Level Access, however, can load tasks for any team member. Team-Level Access is also required to commit the Production Plan once all tasks have been loaded.
To load tasks to the Next Production Plan, complete the steps below:
- From the Main Navigation Bar select the Lookahead, then select the Production Planning mode.
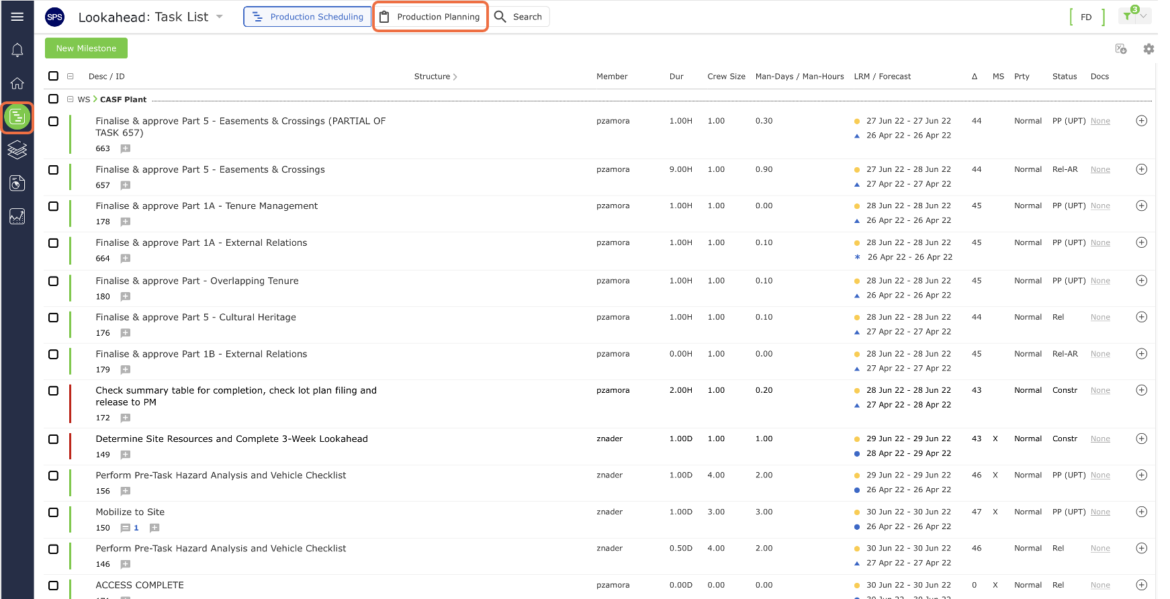
- In loading any task, you should always consider LRM dates, batch size, sequence, and resource availability (capacity, time, and inventory) including constraint analysis to ensure a task’s readiness for execution is assessed. Only when all constraints are removed such as Controls (tolerances, policies, rules), Inputs (information, prerequisite work, materials), and Capacity (equipment, space, labor, time) should an entire or split task be loaded to the Next Production Plan.
Tasks can be loaded in their entirety or as a partial i.e., split task, according to the methods described below. Note that the Split Task function, along with a concise task description, are keys to effective planning and completing work. Once a task is locked into the Current Production Plan, it cannot be changed.
Load Entire Task
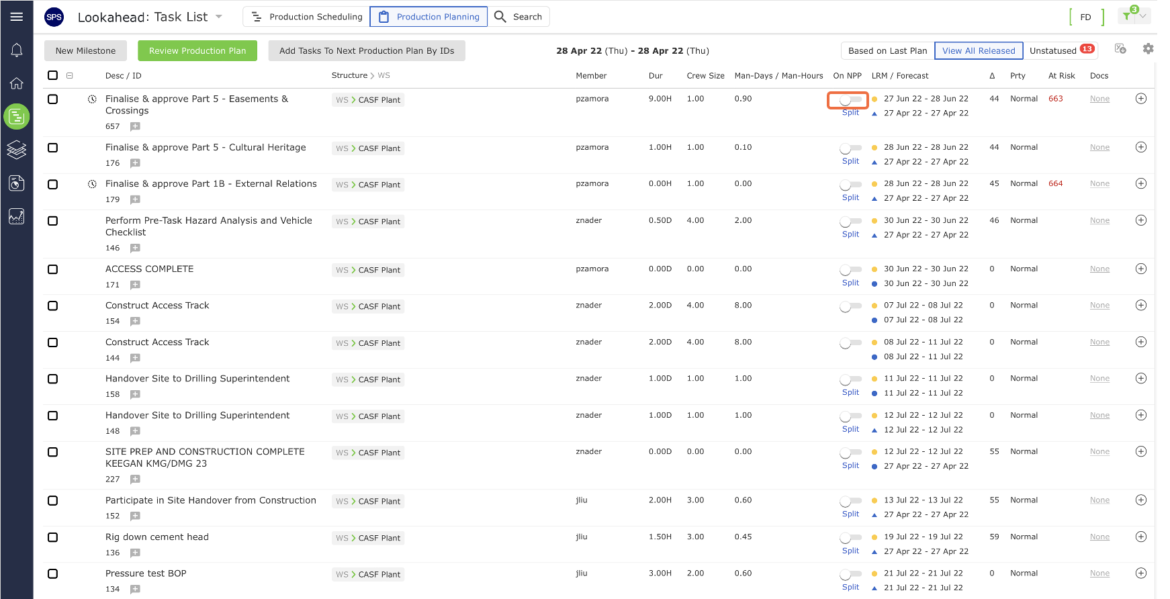
- If a task can and will be completed during the defined Production Horizon, select (load) task(s) for the Production Plan by clicking the Radio button(s) under the On NPP (On Next Production Plan) column.
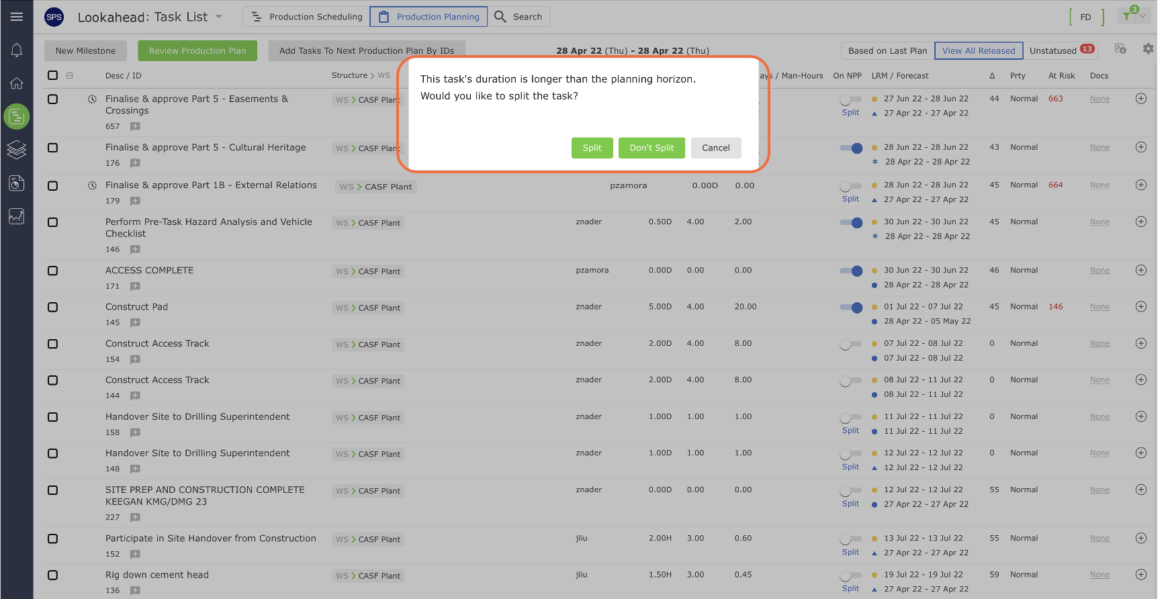
- If a task duration is longer than the Planning Horizon, a confirmation window asking to split the task will show. Click OK to create the split task, or Cancel to commit the whole duration within the production cycle. See Load Split Task for instructions on entering split task detail.
Load Split Task
If the task cannot or will not be completed during the Production Horizon, click the Split link below the Radio button.
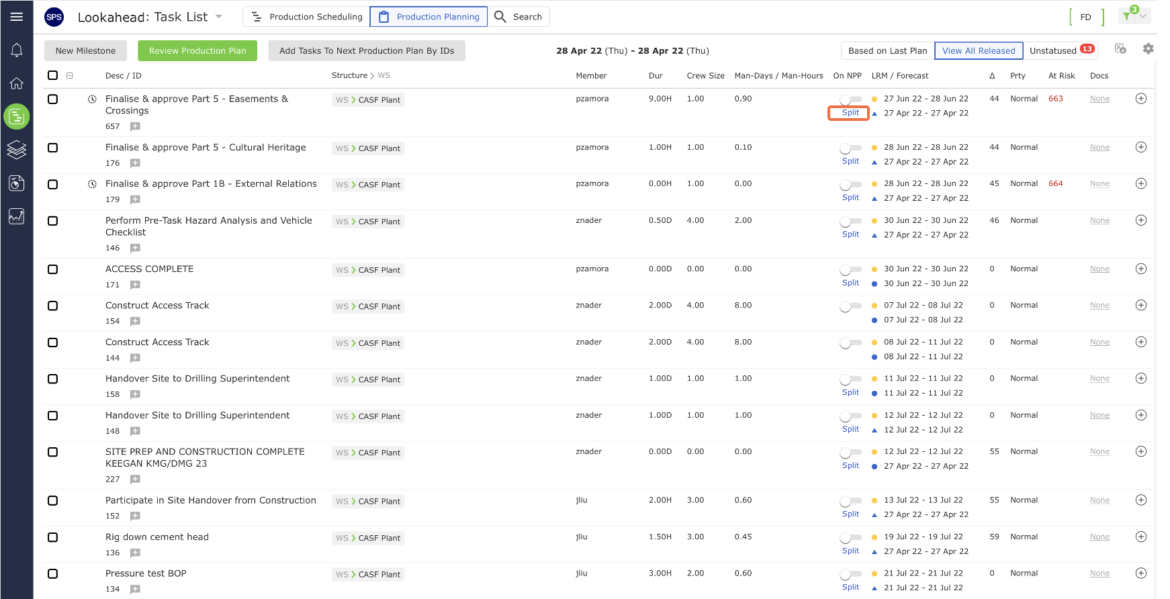
- Click OK in the confirmation window to split the task or Cancel to commit the whole task duration.
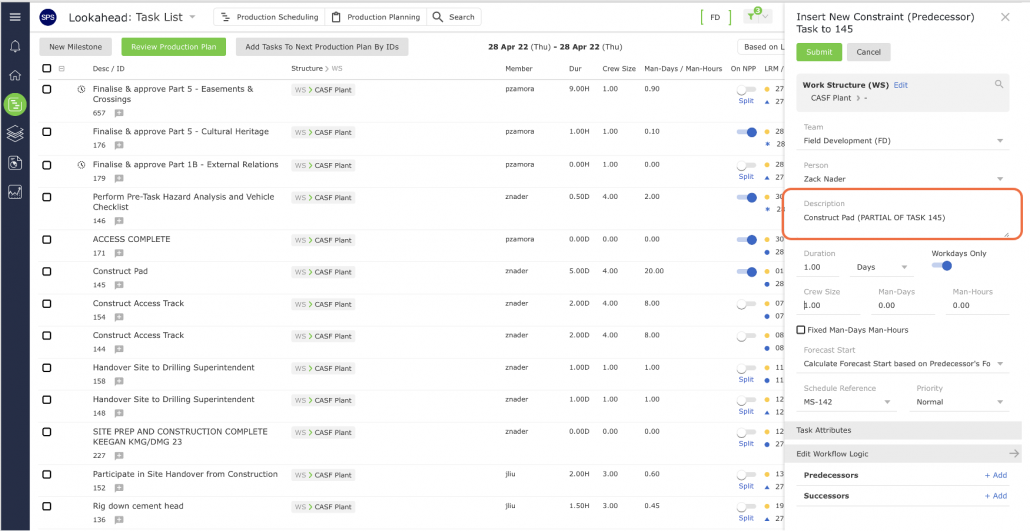
To identify a new split task, its description will have ‘Partial of Task xxxxxx’ after the original task description. Modify the estimated duration and description to reflect the specific commitment. The new partial task acts as its child task. The parent task still exists in the Lookahead with a reduced duration to reflect the partial task duration.
Loading a task to the Next Production Plan will release any successor task(s) which will be visible with a Rel-AR (Released-At Risk) status, with options for additional commitment if capacity is available and according to priorities as shown in the image below. Tasks that are Released-At Risk can also be identified by the red Task ID in the At Risk column.
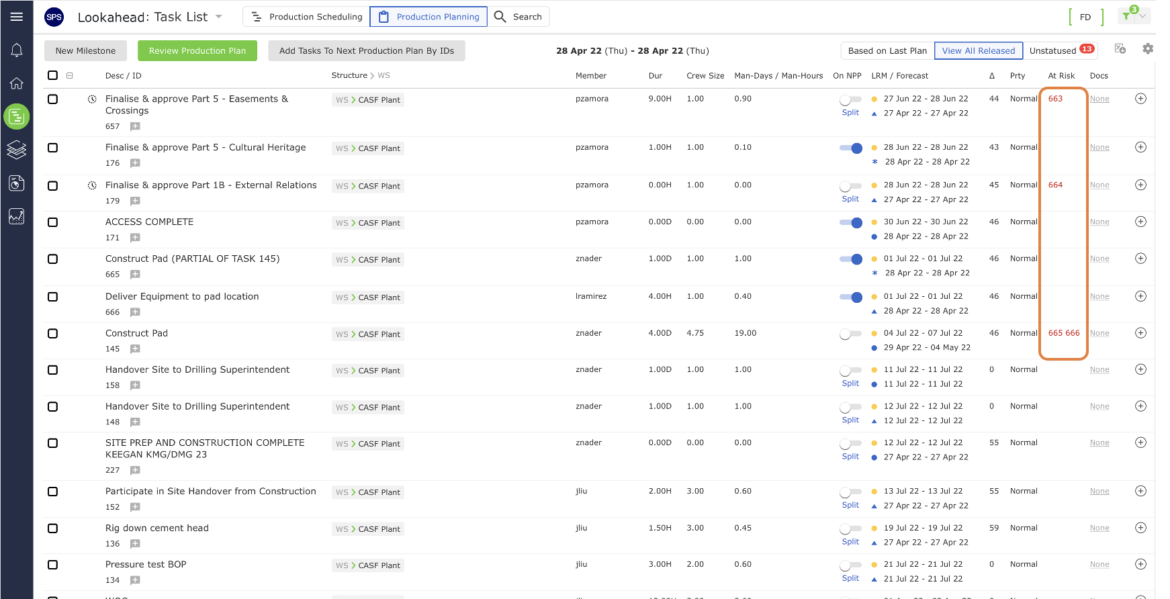
Before loading any Released-At Risk tasks, however, it is important to determine whether the predecessor(s) and the Released-At Risk tasks can be completed within the Planning Horizon. Tasks that cannot be completed within the Planning Horizon should not be loaded onto the Next Production Plan, as doing so will impact Commitment Reliability and work execution across the workstream.
Note: Released-At Risk tasks may also be visible when the Create Next Production Plan view first loads. This situation occurs when all predecessor tasks belonging to another team have been committed to that team’s Current Production Plan. To load Released-At Risk tasks to the Next Production Plan, repeat the above steps under Load Entire Task or Load Split Task.
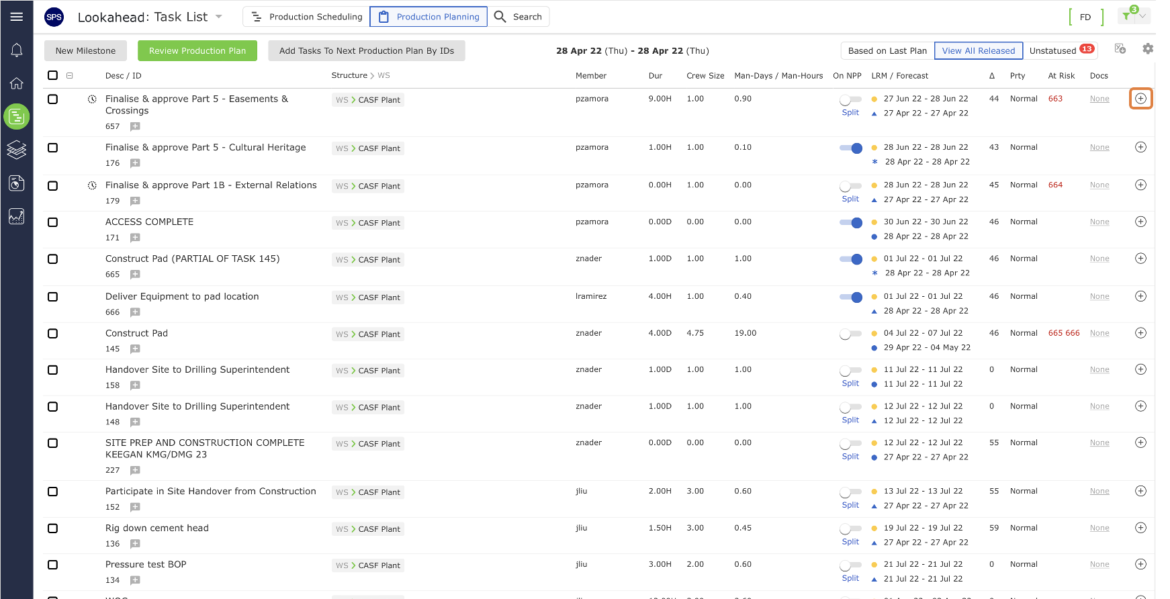
- Insert any constraint tasks that are exposed through the constraint analysis process by clicking the Insert link to the right of the task requiring the constraint. The Insert New Constraint (Predecessor) Task window will open.
- In the Insert New Constraint (Predecessor) Task window, populate the task details for the constraint task using the below guidelines. When finished entering the task attributes, click the Submit to Next Plan button to automatically load the task to the Next Production Plan. Clicking the Submit button will show the task as available (Released) in the Next Production Plan view, but it will not be loaded on the Next Production Plan.
| Parameter | Description |
|---|---|
| Work Structures | Select values for levels 1 – 7 of the Work Structures according to the defined Work Structures for your specific project |
| Team / Member | Team and member who will own and complete the task |
| Task Description | Start the description of the task activity with a verb such as “Install”, “Develop”, “Formulate”, “Fabricate”, “Approve”, etc. (For Completed Not Planned tasks, the verb should be past tense e.g., “Installed” Task description should be specific and a measurable quantity, no greater than the Planning Horizon (e.g., one day, one week, etc.) The level of detail should represent measurable hand-off to the successor activity |
| Duration | Proposed time task will take to complete |
| Forecast Start | Default is based on a “Continuous” Workflow; other options are used when tasks need to start at a different point than anticipated (see selection Task Dates for more information) |
| Schedule Reference | Displays the reference to the milestone the task is constraining |
| Priority | Default set as “Normal”, other options include “Low” and “High” |
| Step No. | Refer to the “Step Number Reference” (if enabled) under the Help Menu of the Tools for the correct Step No. that applies to the task type; keep in mind that not all tasks require Step No.’s, consult with our System Administrator if you have questions about Step No.’s |
| Task Calendar | Unless the task is using a different calendar than the Team Default Calendar, use “Default Calendar” |
| Workdays Only | Check “Workdays Only” if the task will only be completed during the workweek |
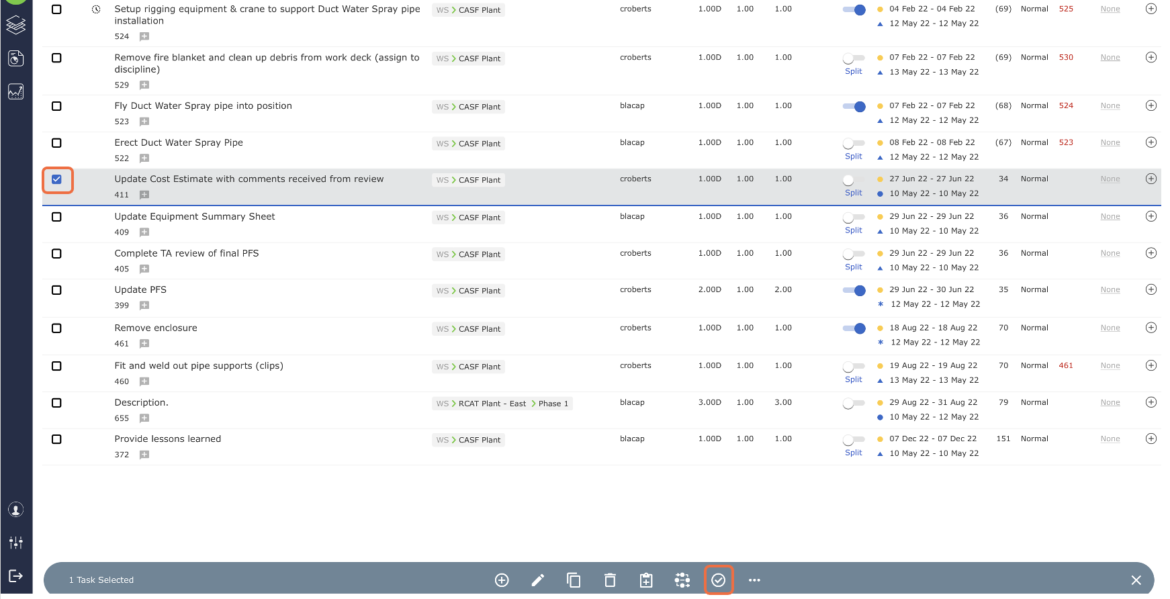
- Status any released tasks that have already been completed by first clicking on the task followed by selecting the Complete Not Planned icon on the bottom floating toolbar.
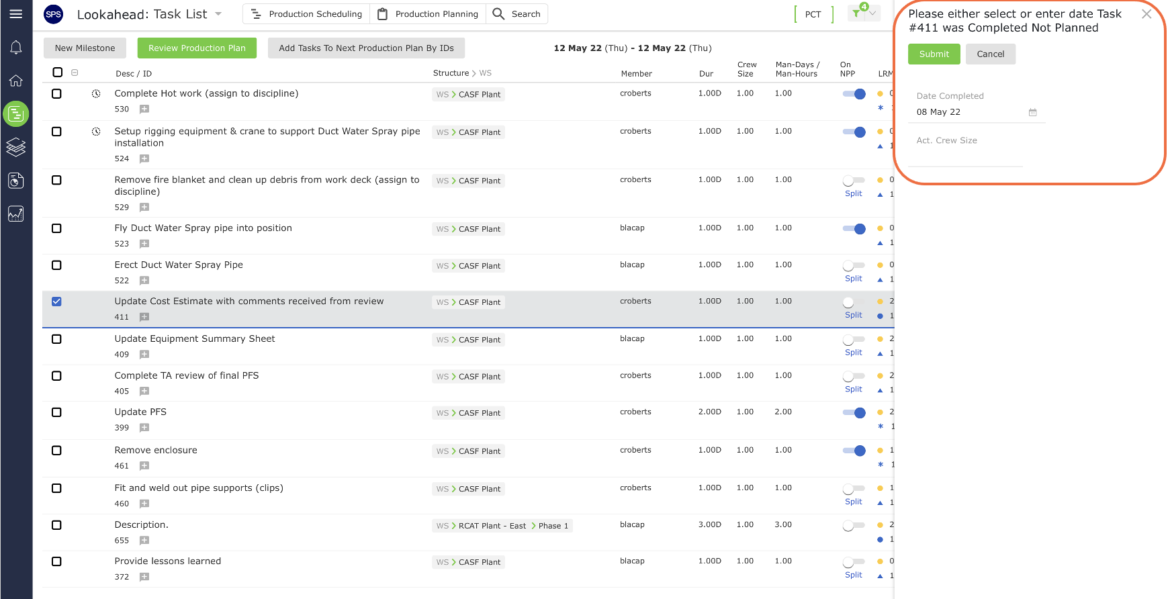
- In the Date Completed Not Planned window that displays, enter the actual completion date for the task and click the Submit button as shown in the image below. The task will then disappear from the Create Next Production Plan view and release any successor tasks.
- Although you can access the Create Next Production Plan view even when the Current Production Plan exists (viewable through Update Production Plan), you cannot commit to the Next Production Plan until the status of the Current Production Plan is updated and the Plan is closed out.